Showing posts with label SP2010. Show all posts

Saturday, June 15, 2013

Scroll Gantt view to today in SharePoint 2010 & 2013

Abstract, here is a trick to have the SharePoint Gantt view displayed scolled to today instead of the first day of the earliest task. Tested on SharePoint 2010 & SharePoint 2013. Here comes the trick and how it was found

SharePoint Gantt views are a great tool to visualy embrace a set of data\dates but they suffer from a few usability issue. First one is that Gantt view always center on the earliest date of the tasks displayed. This is often an issue if you display projects spanning multiple months or year as you don’t see today’s situation :
Default SharePoint Gantt view centers on the earliest date


We decided to fix it. Our first stop was to take a look at SharePoint out of the box SPGantt.js file (SPGantt.debug.js for convenience), where best to find out what was possible. Searching for scroll brought up a few reference including this very promising one :

 this.ScrollGanttToTask=function()

      ….

      _jsGridControl.ScrollGanttToDate(date);

      ….


Next step was to manage to get an handle on this jsGridControl object. Fiddling through the DOM with Google Chrome (Elements and console tabs) we found out the *_ListViewWebPartJSGrid object had a nice jsgrid property that returns the object we need

 And this object indeed have a ScrollGanttToDate function

 If you use jQuery here is how to retrieve the object and scroll to today. Depending how\where you use it, you might want to make sure the object exists (if($("div [id$='_ListViewWebPartJSGrid']").length) ) before using the property jsGrid.

$("div [id$='_ListViewWebPartJSGrid']")[0].jsgrid.ScrollGanttToDate(new Date()) 

Tada !
SharePoint Gantt view centered on today's date

Friday, February 15, 2013

SharePoint 2010, power up your tags by making them clickable

SharePoint 2010 introduced a great new feature that is used even more in SharePoint 2013, the tags. A major drawback of tags is that they are not clickable except in very specific scenario.
This post will explain some termstore\tagging concept before explaining how to make these tags clickable through a relatively small development. I’ll also talk very briefly about how to put in place a custom tag page as a target of these clickable tags.

Not all tags are born equal

The Managed Metadata Service Application aka as the termstore or to put it simply: Tags serves a lot of purpose from document classification to libraries navigation, search facet (even navigation and friendly URL in SharePoint 2013).
But it’s not so simple; Microsoft actually introduced two kind of tagging in SharePoint 2010:
  • imageTags as properties of documents (actual tags thereafter) where the property values are picked from a list of possible values (part of the termstore with Managed Metadata typed column or whole termstore with Enterprise Keyword site column). Users can be allowed to submit values (folksonomy basis). The tag becomes a property of the document and actually describes it. The tag value is cached in the site collection itself in an hidden library (always at http://YOURSITE/Lists/TaxonomyHiddenList)
  • imageTags as social actions (Social Tags), users can also in some places (at least enabled Document Libraries, Pages) social tags items. The tags values are picked from the termstore, however in this case the tags is not actually associated with the documents, it’s actually a property of the user. This action is not written down in the site collection content database at all but only lay in the User Profile Social database.
There is a major difference between these two types of tagging, one is an actual document property that can be used to classify and find the document, the other one is just a social action.
image
Microsoft decided to make social tags clickable, these links points to the tagpage. However to make sure we get confused, the tagpage actually just display the contents that has been “social tagged”. If a document has been classified with an actual tag, it will not appear in the tagpage. This is because the tagpage is actually a page to display the social actions of the users, the fact that it lay in the user profile web application leaves no doubt.
The issue is that social tags are not so useful for actual content management whereas actual tags are a must. Thus we realized we had no choice but to make these tags clickable and create our own tag page.

Click me ! Click me !

For the sake or maintainability\ease of use\compatibility and future evolutions we decided not to create a custom field type. Instead we focused our efforts on finding a way to make the out of the box field types clickable. There are actually only two of these, the SingleTaxonomyFieldType and MultipTaxoFieldType that are used for both Enterprise Keywords site columns and Managemed Metadata columns. We wanted to stick with supported customization so we made use of an extensibility option proposed with SharePoint 2010 (MSDN: Overview of XSLT List View Rendering System http://msdn.microsoft.com/en-us/library/ff604024(v=office.14).aspx ) that allow to change the rendering of an existing type, a real improvement from SharePoint 2007 by the way.
So to change multiple tags fields to red, create a xsl file named fldtypes_WHATYOUWANT.xsl in \Program Files\Common Files\Microsoft Shared\Web Server Extensions\14\TEMPLATE\LAYOUTS\XSL


<xsl:stylesheet version="1.0"  exclude-result-prefixes="xsl msxsl ddwrt"   xmlns:xsl="http://www.w3.org/1999/XSL/Transform"> 

<xsl:template  match="FieldRef[@FieldType='TaxonomyFieldTypeMulti']"
priority="1"  mode="Lookup_body">
<xsl:param name="thisNode" select="."/>
<span style="color:red">
<xsl:value-of select="$thisNode/@*[name()=current()/@Name]"/>
</span>
</xsl:template> </xsl:stylesheet>


Beware of the priority setting above, that’s the key to make sure your customization is applied. You can quick-test that manually by placing the file and IISRESET.


With a bit more work to get the actual link we need, here is the result

Before
image

After
imageimage


Cherry on the cake, there isn’t anything easier to deploy with a WSP, absolutely no code involved, just a folder mapping in Visual Studio.


Note that this works fine for list\libraries views when displaying multiple items, when displaying a single item (View Form), we used a small JavaScript to introduce the link, displaying only a single item means that performance is not an issue in this case.


A link, but where to ?


It’s great to have a link but links are supposed to point somewhere. As the default tag page only uses social tags it’s useless so we decided to create our own tag page.


The easiest solution we found to have both speed and security trimming was the search engine. Thus all the heavy-lifting is done by search while we can focus on displaying these results. This is possible because the search engine (tested on FAST 4 SharePoint, not Enterprise Search) has got a dedicated managed property to store tags that is queryable : Owsmetadatafacetinfo. This is the one used to render the tags facet on out of the box search pages.

So to test it, just run a search for :


Owsmetadatafacetinfo:ATAG


That’s it plain and simple and now you have the main ingredient to build your own tag page from scratch.

Conclusion

It first seemed like a major challenge at first to make tags as document properties useful (clickable + tag page) in the end it’s actually fairly simple when you know the tricks and the results is definitely worth it. If you wonder about SharePoint 2013, this development has not yet been tested in this configuration, though we know for sure that it will be needed as tags are still not clickable in SharePoint 2013.The good news SP2013 news is that there seems to be an out of the box tag page that actually work since it’s based on search. I will test it more extensively and let you know.

Tuesday, March 27, 2012

SharePoint 2010 Search – december CU warning

If you are currently running a pre December 2011 CU farm and have set up custom search center be careful before installing it. It seems like the maximum number of filters per refiner limits have been set to 250. We were previously using a value of 255 for a refiner. Thus installing the CU (SPF, SPF) broke our search center page with the following error:

Internal server error exception: System.ArgumentException: Max number of filters has to be between 0 and 250     at Microsoft.Office.Server.Search.WebControls.FilterCategory.set_MaxNumberOfFilters(Int32 value)

After discovering the issue we changed to value to 0 (display all the filters according to MSDN http://msdn.microsoft.com/en-us/library/ff625183.aspx, thank you Wesley for the suggestion by the way :) )

<WpNs0:UbiRefineMentWebPart FilterCategoriesDefinition

    MaxNumberOfFilters=&quot;255&quot;

to

<WpNs0:UbiRefineMentWebPart FilterCategoriesDefinition

    MaxNumberOfFilters=&quot;0&quot;

And problem solved.

More complete log below for searching purpose :

03/20/2012 16:16:07.85 w3wp.exe (0x1578)       0x1724  SharePoint Server Search           Query   dn1p                Medium              Filter category FASTMaxNumberOfFilters in the config is in wrong format.Input string was not in a correct format.

03/20/2012 16:16:07.85 w3wp.exe (0x1578)       0x1724  SharePoint Server Search           Query   g1j9                Exception           Internal server error exception: System.ArgumentException: Max number of filters has to be between 0 and 250     at Microsoft.Office.Server.Search.WebControls.FilterCategory.set_MaxNumberOfFilters(Int32 value)     at Microsoft.Office.Server.Search.WebControls.RefinementManager.ConfigureCategories()     at Microsoft.Office.Server.Search.WebControls.RefinementManager.Initialize(Location location)     at Microsoft.Office.Server.Search.WebControls.CoreResultsDatasourceView.CreateLocationList()     at Microsoft.Office.Server.Search.WebControls.CoreResultsDatasourceView.SetPropertiesOnQdra()     at Microsoft.Office.Server.Search.WebControls.SearchResultsBaseWebPart.EnsureWebpartReady() System.ArgumentException: Max number of filters has to be between 0 and 250     at Microsoft.Office.Server.Search.WebControls.FilterCategory.set_MaxNumberOfFilters(Int32 value)     at Microsoft.Office.Server.Search.WebControls.RefinementManager.ConfigureCategories()     at Microsoft.Office.Server.Search.WebControls.RefinementManager.Initialize(Location location)     at Microsoft.Office.Server.Search.WebControls.CoreResultsDatasourceView.CreateLocationList()     at Microsoft.Office.Server.Search.WebControls.CoreResultsDatasourceView.SetPropertiesOnQdra()     at Microsoft.Office.Server.Search.WebControls.SearchResultsBaseWebPart.EnsureWebpartReady()

Saturday, July 23, 2011

7 tips and tricks about the User Profile Replication Engine

image


The SharePoint User Profile Replication Engine (part of the SharePoint Administration Toolkit) is a powerful beast that you can use to:


  • Migrate user profiles from a different farm to your farm (MOSS 2007 to SPS 2010 IS supported)
  • Synchronize user profiles from a master a farm to a different farm (geographical replication or disaster recovery farm replication)

I have been playing with this tool a bit lately and here are a few things I noticed that might interest you. First of I would advise you to start with the official documentation at: http://technet.microsoft.com/en-us/library/cc663011.aspx . You will most likely only use the full and incremental commands.

1 -Full replication DOES NOT use any windows service

The Full synchronization ( Start-SPProfileServiceFullReplication )does not uses the Windows Service (aptly named “Replication Engine”) used by the incremental command (Start-SPProfileServiceIncrementalReplication). This is important as it means that the full sync is done with the account you launched the command line with WHEREAS the incremental sync is done with the “Replication Engine” service account. Knowing which account is running is important to know which account needs the permissions on the User Profile Service Applications.

2 - Local Admin permissions IS NOT needed for incremental sync

Running the incremental sync (i.e. the windows service) is possible with a non-local administrator account, but it needs:

  • Full permissions on the local folder where the replication engine is installed (C:\Program Files\Microsoft\SharePoint 2010 Administration Toolkit\Replication Engine)
  • Full permissions on the registry hive
    • HKLM:\Software\Microsoft\Replication Engine
    • HKLM:\SYSTEM\CurrentControlSet\services\eventlog
    • HKLM:\Software\Microsoft\EnterpriseCertificates

This is not based on any official documentation; I had to use Process Explorer to actually see what was preventing the Replication Engine from starting when running with a non-local admin account. The last two permissions might be optional but I added these anyway to be on the safe side. So far I haven’t seen any downside to this workaround.

3 - Full replication IS NOT needed before starting incremental sync

At least it is not always needed. If the User Profiles are already in sync because you did a fresh install and imported the profiles on source and destination with no other changes, you might skip the full sync and start with the incremental sync.

But if there is any difference between your two User Profiles SAs, start with the full as these differences will not be propagated.

In fact the incremental sync only propagates information that has been changed while it is running.

4 - Account changing option (credential parameter) behaves badly

The credential parameter of the Start-SPProfileServiceIncrementalReplication should be used to specify the windows service credential on the first run according to the documentation, well I don’t because it works erratically giving inconsistent results. Instead I set the windows service account itself. You can even do it in scripts.

5 - Social sync IS supported BUT

Social sync doesn’t included managed metadata (because it isn’t part of the User Profiles Service Application obviously) event though tagging is based on managed metadata. In fact tagging is stored in the User Profile DB as reference to the managed metadata entry.

Thus if you need to replicate tags you MUST replicate the managed metadata SA data as well.

6 - MySite URL CAN be replaced with the central administration Url

The documentation tells you to use the MySite Host Url for Source and destination but you can use the central administration URL as well.

In DRP (Disaster Recovery Plan) configuration it might be cumbersome to do so as URLs are shared on the source and destination farm. But the central administration URL being based on machine names is different on both farms.

Beware: this might depend on whether or not you User Profile SA is in the default Service Application Proxy group.

7 - Incremental sync is as fast as light

Yup it is seriously fast, so fast I thought my test protocol was broken when I started to test the replication :)

Sunday, February 06, 2011

SharePoint 2010 – Resizing the Ribbon bar

image Recently I was asked to add some element in the ribbon upper part just before the Site Actions Menu. Thus I needed to increase the height of the upper part of the ribbon to fit our content (blue part in the screenshot above).


Problem

After spending an insane amount of time on what seemed so simple, I managed to get it kinda working. I say “kinda” because no matter what I did I couldn’t get the ribbon to display correctly when it was opened.

After checking this article from the SharePoint team: http://sharepoint.microsoft.com/blog/Pages/BlogPost.aspx?PageType=4&ListId={72C1C85B-1D2D-4A4A-90DE-CA74A7808184}&pID=426

I understood that it came from a FixRibbonAndWorkspaceDimensions() javascript function from init.js that just kept setting the height at 44px (ribbon collapsed) or 135px (ribbon opened) no matter what my CSS said. The culprit line is:

var baseRibbonHeight=RibbonIsMinimized() ? 44 : 135;

No need to tell you that after hearing Microsoft boast about their compliance with the latest Web Design best practices, I was expecting more than to find hard-coded height values in a JavaScript file…

Solution

Yet everything isn’t lost as the actual ribbonHeight is the aforementioned value plus a padding value

var ribbonHeight=baseRibbonHeight+g_wpadderHeight;

Thus if you want to increase the ribbon height, you just need to set the javascript variable g_wpadderHeight to the value you want to increment. You might do that in your masterpage as such :

<script type="text/javascript">

g_wpadderHeight = 30;

</script>

Something else to note, the WebPart adding part of the ribbon stopped displaying the “Add”, “Cancel” button after resizing the ribbon bar as they were out of the box. I solved this problem with a bit of css :

.ms-wpadder-buttonArea{

padding-bottom:30px;

}

Thursday, January 20, 2011

Custom site logo not appearing on WebPart page

As you probably all know, SharePoint 2010 allows site administrators to change the sites logos just like 2007 did. This is done on the “Title, description, and icon” page

clip_image002

clip_image004

The picture then appears in the top left of the site pages, just before the page title/breadcrumb


clip_image006

The trouble is that this doesn’t work on WebPart pages, no matter what you do; users will still see the default yellow icon.


Cause

clip_image008

WebPart pages use the TitleBarWebPart, this WebPart allows you to specify a title and logo for the page using the button in the ribbon bar

The problem here is that whatever you do, this Web Part always overrides your site logo setting. If you specify a page specific logo along with the title, it will use it. If you don’t specify a page specific logo, it will use the default SharePoint logo.

This overriding is done in javascript by the code below that you will find at the end of your web part page :

var logoImg = documentGetElementsByName('onetidHeadbnnr0');
if (logoImg != undefined && logoImg[0] != undefined)
logoImg[0].src='/_layouts/images/siteIcon.png';


This javascript code is generated by the TitleBarWebPart, the “/_layouts/images/siteIcon.png” is replaced with the page specific logo if you set one. Thus this WebPart systematically overrides the site wide logo settings.
By the way you will notice that it doesn’t work under Chrome 8 because of a Javascript error.

Solution


Aaron Han suggested removing the Web part from the pages impacted on a MSDN forum:
http://social.msdn.microsoft.com/Forums/en-US/sharepoint2010customization/thread/9706669e-0488-45cd-9cf6-2edfef91f77f
If you don’t want to edit every single WebPart page and/or if you want to retain the ability to change the page title I have another solution for you.
My solution is to change the SiteLogoImage node name in the master page. Thus the javascript generated by the PageTitleWebPart is no longer able to change the logo.

Details

Open your master page and find the line starting with:
<SharePoint:SiteLogoImage name="onetidHeadbnnr0"
And replace the “onetidHeadbnnr0” name with something else; “onetidHeadbnnr1” will do the trick.

Conclusion

I haven’t seen any drawback with this technique, yet :). Tell me if you do !

Wednesday, May 05, 2010

Using tabs in SharePoint 2010 central administration, a solution

image I don’t know about you but tabbed navigation has become a must have for me in the past years. I mean who wants to open a different window for each and every web page.

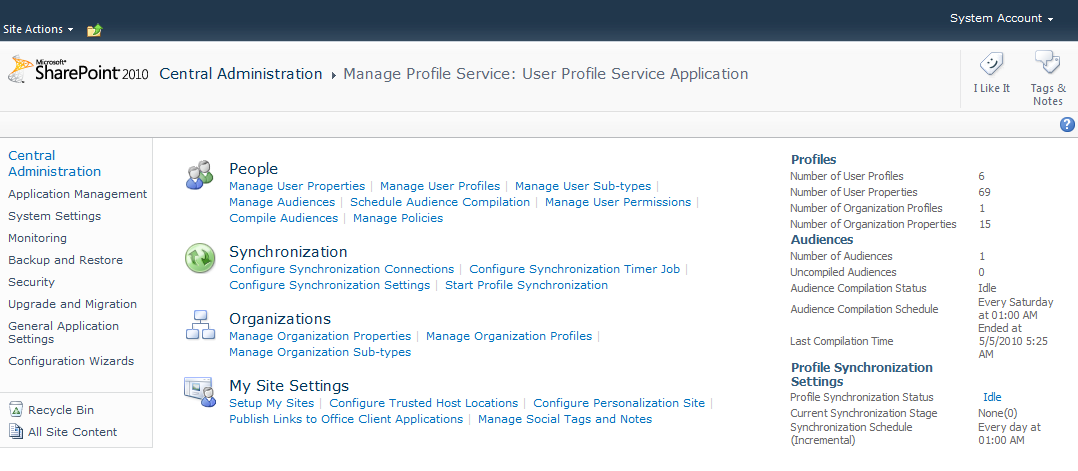
Well my friends, it seems like Microsoft remembers too fondly those pre-tab browsing days and wants us to return to this prehistoric era. I am talking about the infamous Javascript links one can find in the SharePoint 2010 Central Administration – User Profile Service Application management page:

image

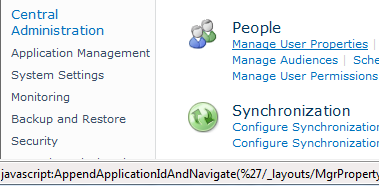
If you mouse over those links, you will see in the status bar that they are not actual links but instead Javascript calls:

image

If you add to that, the fact that the navigation is completely useless in this site, you have the recipe for a disastrous user experience as you can’t even open tab to compensate.

Having to work with the User Profile Service Application for a client I got fed up with the situation and decided to act. As javascript is the swiss knife of SharePointer, I wrote a script to replace those javascripts link with actual links so that I can open these links in tabs if needed :

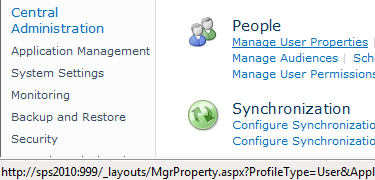
image

Voila, here are your tab-compliant links.

As FireFox is now fully supported by SharePoint, I use this code in a GreaseMonkey user script. This way the script is applied on this page whatever the farm I am administering. Without even having to modify anything on the farms.

To add the user script, nothing too fancy, just add “*/_layouts/ManageUserProfileServiceApplication.aspx*” in the include. And add the following as the code :

// Jonathan Roussel - http://blog.jonathanroussel.com

// Make sure to Include */_layouts/ManageUserProfileServiceApplication.aspx*

var cUrl=document.location.href;
var aId = cUrl.substring(cUrl.indexOf("ApplicationID"));
var links,link;

links=document.getElementsByTagName("a");
for(var i=0;i<links.length;i++)
{
var link = links[i];
if(link.href.indexOf("javascript:AppendApplicationIdAndNavigate(")>=0)
{
link.href = link.href.substring(45,link.href.length-2) +aId;
}
};

If you want a more portable solution, I also put this code together as a Bookmarklet. Just drag and drop this link to your favorite bar. Thus whenever you are on the “Manage User Profile” page, just hit the link in the favorite bar to transform these nasty Javascript links into actual links.


SP2010_SCA_TabAllower


Tested with IE8, FireFox 3.6, Chrome 4.1.